Landscapes
Composition Challenge
Objective
Have you ever stood on top of a mountain, taken a picture on your phone, and then looked at it later and wondered why it looks so much smaller? That’s the challenge we’re facing this week: Making your audience feel the grandeur of the view laid out before them.
A great landscape photo doesn’t just show a big place. It makes your audience feel how big, how deep, and how far away everything is.
Our goal is to build depth into our photos by stacking the scene into layers: a foreground to stand on, a middle ground to explore, and a background that stretches all the way to the horizon.
Warm-Up Prompts
To warm up our thinking, consider these prompts. You don’t have to answer them all, but read them over and try to find the one that sparks a creative reaction.
Remembering: What are the three layers of a landscape photo, and what job does each one do?
Understanding: Why do distant features look paler or hazy the farther away they are? How could that atmospheric perspective help a photo feel deep?
Applying: Without even using your camera, look out the nearest window. Name one thing that could be your foreground, one for your middle ground, and one for your background.
Analyzing: Compare the two wide panoramas in the examples. One has people in it, and one barely does. How does that change how big the place feels?
Evaluating: “You need a big, dramatic view to take a good landscape photo.” Do you agree or disagree, and why?
Guide
Find your foreground first. A rock, a stone tower, a fence post, a patch of flowers. Get low, put it close to your lens, and let the rest of the scene stretch out behind it.
Decide where your horizon line goes before you press the shutter. Flat, boring sky? Push the horizon up high and give the ground the room. Wild, swirling clouds? Drop the horizon low and let the sky be the star. Try to keep it out of the exact middle, where it will just cut your photo in half.
Give us a sense of scale. A person, a bench, a single tree. Without something we recognize, a distant mountain could be merely a boulder on the beach.
Try your phone’s panorama mode. Move slowly and keep it steady. What happens to the horizon? Does the scene feel bigger, or just wider? What happens if you turn your phone so the horizon is no longer level?
Landscapes don’t have to be far away. Step into the woods and look for an intimate landscape such as a path between trees, a patch of tall grass, sunlight falling through branches.
Process
Decide on your personal goal. Are you hunting for the biggest view you can find, like a hilltop, a lake, or a city skyline? Or are you exploring a small, hidden landscape, like a trail through the woods or the edge of a creek?
Prepare to take photos:
Scout first. Walk around before you shoot and look for a foreground you can build the whole picture on.
Check the light. Early morning and late afternoon give long shadows that make hills and rocks pop. Gray days give soft, misty layers.
Hold your camera level. A tilted horizon makes the whole world feel like it’s sliding off the page (unless that’s exactly what you want).
Capture way more photos than you think you need. Experiment. Have fun! Most of them might be failures, but that’s part of the process.
Ask yourself this week’s Guiding Questions while you shoot. Let them push you to see things differently.
Make every photo unique. Shoot the same view standing up, crouching low, and lying on the ground. Shoot it horizontal, vertical, and as a panorama.
Make sure you’ve met the objective to the best of your ability.
Pick four photos to share with our classroom.
Try to provide the f-stop, shutter speed, and ISO for each photo. This data helps us all learn.
Guiding Questions
When your audience steps into your photo, what are they standing on?
How many layers can you count between your lens and the horizon? What makes each layer look different from the next?
Is the sky the main character of your photo, or just the backdrop? How did you decide where to put the horizon?
What in your photo tells us how big this place really is?
If you could climb inside your photo, what would you hear, smell, and feel on your skin? How does the photo show that?
Where does the eye land first, and what path does it travel to reach the horizon?
What did you leave out of the frame (parking lots, power lines, crowds) and how does that change the story of this place?
Does a landscape have to be wide and far away? What happens when you find one you could walk across in ten steps?
Examples
Examine the layers, horizons, and sense of scale in these example photos.
![300]] ![[21 - Acadia Pano.jpg | 300]] ![[21 - Acadia Landscape.jpeg | 300]] ![[21 - Acadia Square Landscape.jpeg | 300]] ![[21 - Acadia 4-3 Landscape Blue and Green.jpeg | 300]] ![[21 - Stone Pile in Acadia.jpeg | 300]] ![[21 - Birch Path in Acadia.jpg | 300]] 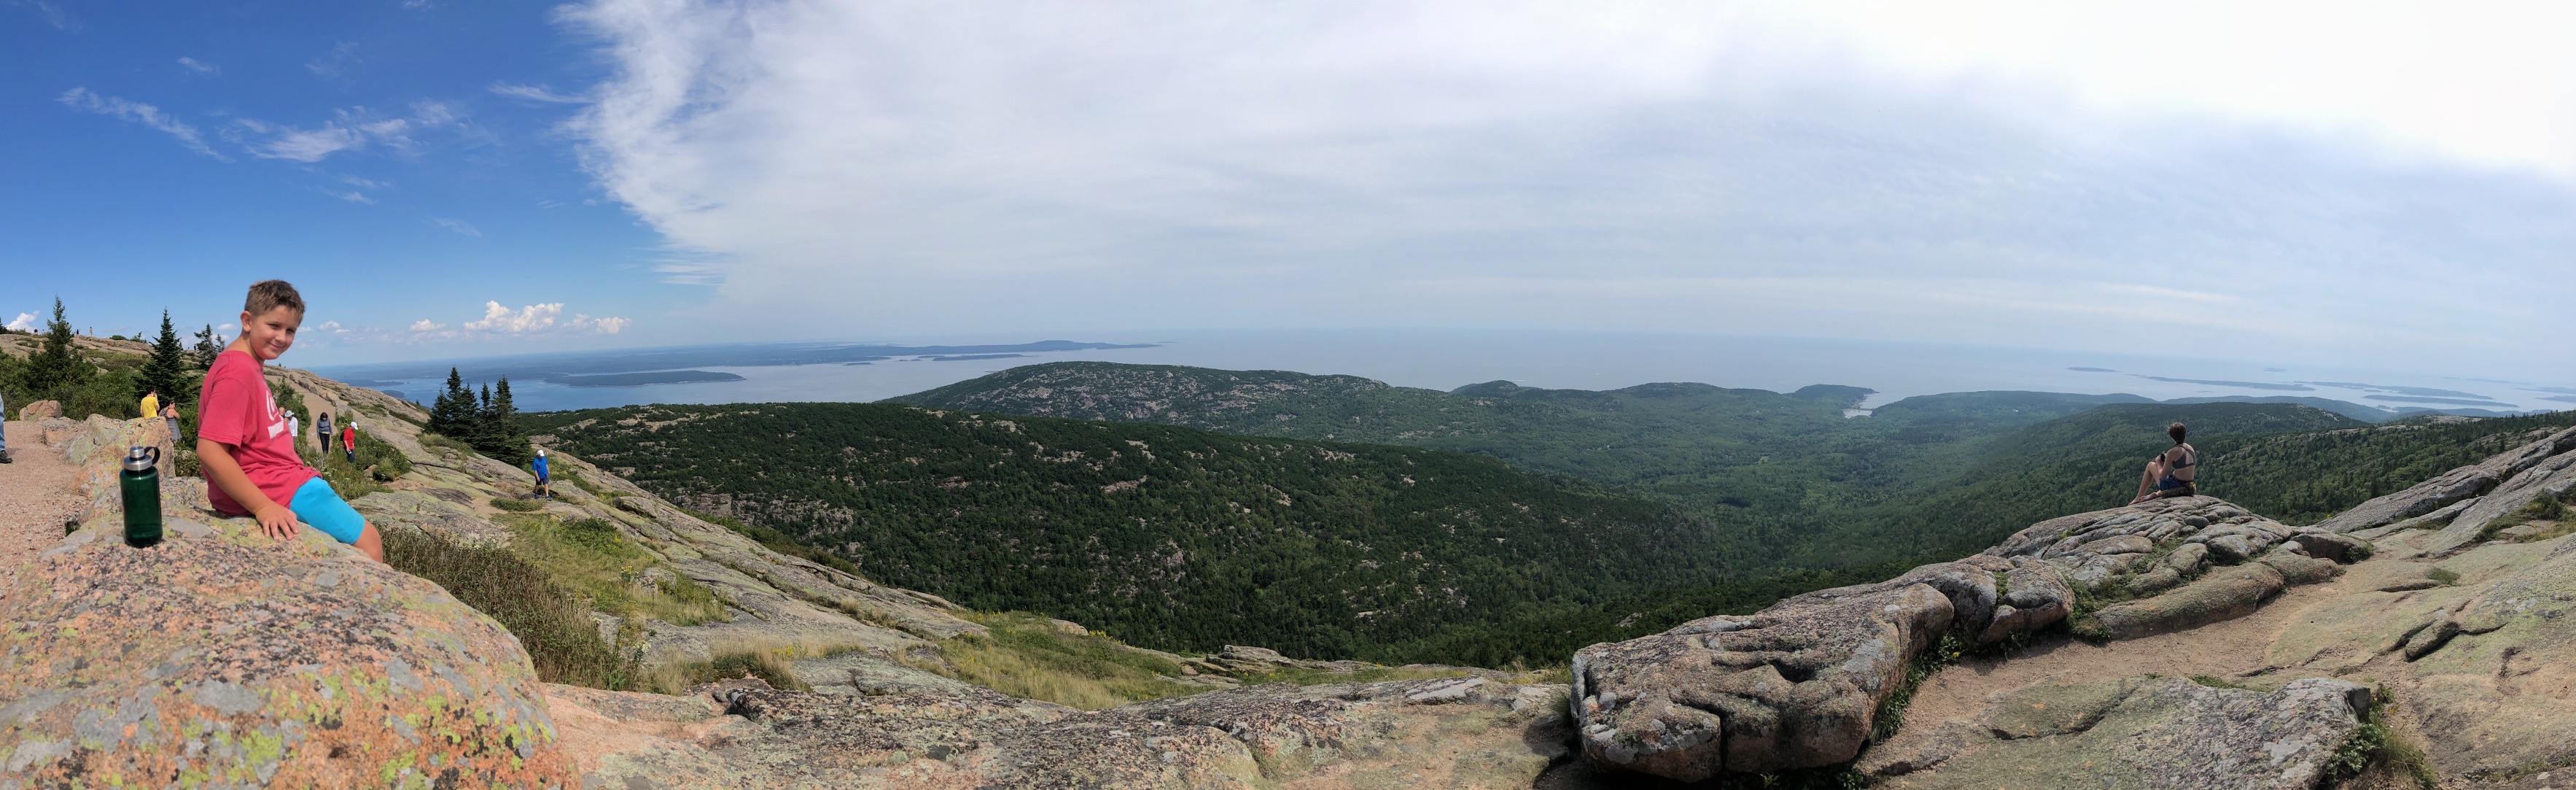
How to Look
The Layer Count: Pick a photo and count its layers from bottom to top. Where does one layer stop and the next begin? Which layer did your eye land on first?
The Tiny Human Test: Find the people in the two wide panoramas. Now cover them with your thumb. Does the mountain get bigger or smaller? Why?
The Sky Swap: Compare the gray, cloudy photos with the bright blue ones. Where did the photographer put the horizon in each? Is that big gray sky earning its space, or would you have cropped it?
The Step-Inside Question: Look at the stone tower on the beach and the trail through the birch trees. What pulls you into the picture? What would your first step feel like?
Self Assessment Checklist and Rubric
To get the most out of photography club, ask yourself these questions and aim for High Quality (3) in all of your photos. Remember that it’s ok to share Low Quality photos, especially if you have questions about how to improve them.
▢ Posted multiple photos.
▢ Commented on other’s photos.
▢ Participated in discussion.
| High Quality (3) | Mediocre Quality (2) | Low Quality (1) | |
|---|---|---|---|
| Concept / Theme | The photo makes us feel the size and depth of the place. We could step into the scene and walk to the horizon. | The photo shows a wide view, but it feels flat. We see the place more than we feel how big it is. | The landscape is a snapshot of scenery with no sense of depth, size, or place. |
| General Composition | Horizon placement, leading lines, or framing deliberately guide the eye from the foreground to the background. | The photo has a horizon or leading lines, but their placement feels accidental: a centered horizon, a crooked line, or an empty half. | The photo shows little control over framing. The horizon is tilted or the eye has nowhere to go. |
| Layers and Depth | Foreground, middle ground, and background are clearly separated, and a foreground anchor or scale cue shows how deep and big the scene is. | The photo has some layers, but nothing anchors the foreground or shows us the scale. | The scene is one flat layer. Distance and size are impossible to judge. |
| Originality | The photographer combines their interpretation of the theme with deliberate layering and horizon choices to create a unique and compelling image. | The photographer attempted to find a unique perspective on the landscape, even if the result isn’t perfect. | The photo is dull or derivative. |